我的U盘原本安装的是WEPE,用起来一直感觉不错,但是没法引导linux的livecd。我试图使用FbinstTool修改,但是改了半天好像也没生效,每次都是直接启动WEPE。无奈之下,只能开始折腾,看看有没有其它手段可以达成WinPE和Linux的多重引导。
最开始我试图弄明白WEPE的三合一引导是咋回事,可惜看完了分别使用U+、B+、UD制作WinPE启动盘 这篇文章还是云里雾里。在看教程的时候又无意间发现有个叫Xorboot的程序,可以同时引导Windows NT和Linux,但是又被论坛积分给挡住了。。。
后来我一想,我自己的笔记本是通过grub2来引导Manjaro和Windows的,为什么不试试强大的grub2呢?虽然我以前制作WinPE都是用那种一键傻瓜式制作的工具,对底层的东西完全不懂,但是现炒现卖应该也不成问题。因此在查阅了一大堆中文英文教程,奋战了几个小时之后,终于成功制作了启动盘。现在将制作过程记录下来,让后来人不用重复走弯路,当然也是免得我以后忘了,又得重新折腾。
在进行下面的操作之前,务必要备份U盘内的数据!
这里使用GParted,毕竟图形界面还是非常直观的。如果非要用命令行分区,那fdisk、gdisk、cfdisk、parted也都可以胜任。这四个里头,个人感觉cfdisk应该是最容易上手的,因为它是图形化的命令行工具。
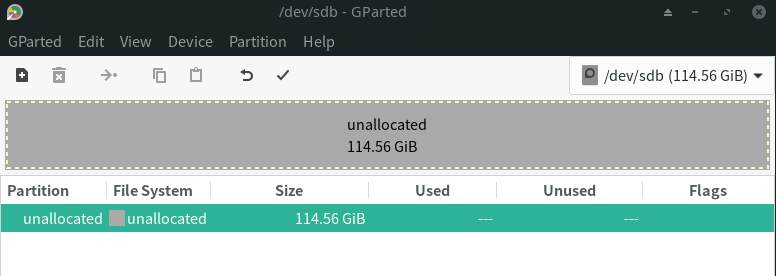
首先要把U盘上面所有的分区都删了,删完之后应该显示“未分配”(unallocated),如下所示
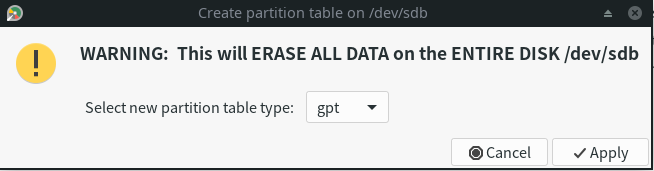
然后通过 Device > Create Partition Table 来建立GPT分区表,这里选中gpt然后点Apply,如下所示
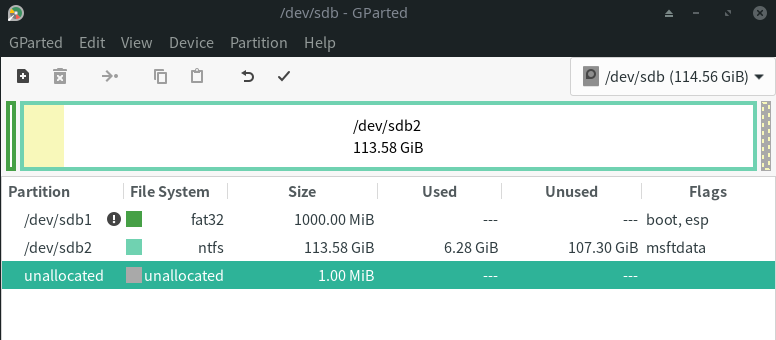
接下来建立分区,一般是建立一个比较小的fat32,只要能放得下winpe就可以了。因为我的U盘容量是128GB,所以我大手一挥就给了1GB,实际上500MB应该也绰绰有余了。当然,U盘剩下的空间就全部给ntfs,这样可以用来储存数据,并且能够在Windows系统读取。
分区之后会发现,此时还有1MB空间未分配,这个是GParted自动预留的,如下所示。
现在需要将其标记成BIOS boot partition(BIOS启动分区)。Arch Wiki在这里解释的通俗易懂,因此直接在下面引用原文。如果想了解更多,可以看GNU GRUB Manual 2.04: BIOS installation 。
BIOS/GPT配置中,必须使用 BIOS 启动分区。GRUB将core.img嵌入到这个分区。此额外分区只由GRUB在BIOS/GPT分区方式中使用。对于BIOS/MBR分区方式,GRUB会把core.img放到MBR后面的间隙中去。而在GPT分区表中是不能保证在第一个分区之前有这样一个可以使用的间隙的。UEFI系统也不需要这额外分区,因为它不需要嵌入启动扇区。UEFI系统需要有EFI系统分区。
然而GParted貌似无法给最后那个分区标记bios_grub,所以就用其它工具来完成。
万能的Arch Wiki上面给出了三种方法:
对于fdisk,选择分区类型BIOS boot。
对于gdisk,选择分区类型代码ef02。
对于parted, 在新创建的分区上设置/激活bios_grub标记
这里我用gdisk来完成,由于是交互式的环境,所以直接放上完整的交互结果。
1
2
3
4
5
6
7
8
9
10
11
12
13
14
15
16
17
18
19
20
21
22
23
24
25
26
27
28
29
30
31
32
33
34
35
36
37
38
39
40
41
42
43
44
45
46
47
$ sudo gdisk /dev/sdb GPT fdisk (gdisk) version 1.0.5 Partition table scan: MBR: protective BSD: not present APM: not present GPT: present Found valid GPT with protective MBR; using GPT. Command (? for help ): n Partition number (3-128, default 3): First sector (34-240254942, default = 240252928) or {+-}size{KMGTP}: Last sector (240252928-240254942, default = 240254942) or {+-}size{KMGTP}: Current type is 8300 (Linux filesystem) Hex code or GUID (L to show codes, Enter = 8300): EF02 Changed type of partition to 'BIOS boot partition' Command (? for help ): p Disk /dev/sdb: 240254976 sectors, 114.6 GiB Model: Ultra USB 3.0 Sector size (logical/physical): 512/512 bytes Disk identifier (GUID): EC111A6E-8655-4C75-802C-170345DB3B0E Partition table holds up to 128 entries Main partition table begins at sector 2 and ends at sector 33 First usable sector is 34, last usable sector is 240254942 Partitions will be aligned on 2048-sector boundaries Total free space is 2014 sectors (1007.0 KiB) Number Start (sector) End (sector) Size Code Name 1 2048 61442047 29.3 GiB EF00 2 61442048 240252927 85.3 GiB 0700 3 240252928 240254942 1007.5 KiB EF02 BIOS boot partition Command (? for help ): w Final checks complete. About to write GPT data. THIS WILL OVERWRITE EXISTING PARTITIONS!! Do you want to proceed? (Y/N): y OK; writing new GUID partition table (GPT) to /dev/sdb. The operation has completed successfully.
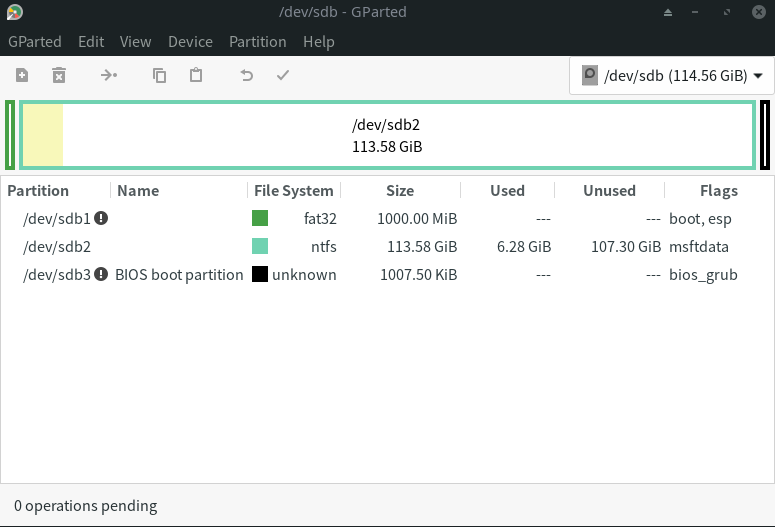
搞定之后,U盘的分区应该跟下面这个类似
首先挂载esp(EFI system partition)到/mnt,下面命令带参数就可以免root操作文件,会舒服很多。
1 sudo mount /dev/sdb1 /mnt -o uid=$USER ,gid=$USER
然后使用grub-install命令安装。因为是把grub安装到U盘上,所以需要带上--removable。这个命令需要一点时间才能执行完,所以耐心等一会儿。
1
2
3
$ sudo grub-install --target x86_64-efi --efi-directory /mnt --boot-directory=/mnt/boot --removable Installing for x86_64-efi platform. Installation finished. No error reported.
WEPE官网只分发exe格式的一键安装器,我试图用wine运行,结果失败。无奈之下,还是开了个win10虚拟机来进行操作。
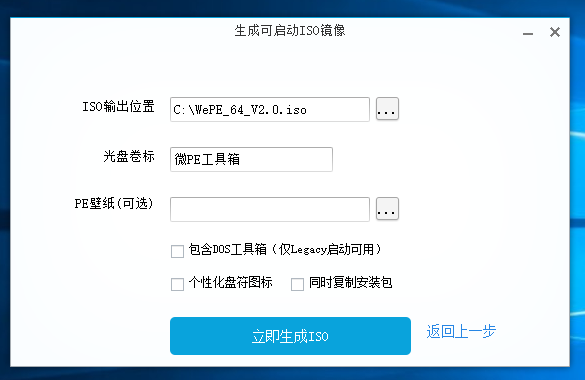
打开安装器之后,点击右下角的光盘图标,然后点击“立即生成ISO”,如下所示。
此时U盘esp目录的挂载点是/mnt,这里需要进行下面操作:
把/WEPE复制到/mnt
把/EFI/MICROSOFT复制到/mnt/EFI
操作完之后,U盘的esp目录结构如下
1
2
3
4
5
6
7
/mnt ├── boot │ └── grub ├── EFI │ ├── BOOT │ └── MICROSOFT └── WEPE
进入BOOT文件夹就会发现,里头只有BCD文件,还少一个bootmgfw.efi。我当时在安装Manjaro Linux的时候,留了一个30GB的win10来救急。因为Linux会自动把esp挂载到/boot/efi,所以直接在本机的esp分区 > EFI > Microsoft > Boot就可以找到到bootmgfw.efi,最后复制到U盘的BOOT文件夹就行了。
Linux的iso是不用解压就能直接引导的,所以直接存放在NTFS分区即可,甚至还可以分类摆放。Windows的iso是可以在WinPE里头直接安装的,所以也放在NTFS分区。下面给出示例结构。
1
2
3
4
5
6
7
8
9
10
11
12
13
NTFS分区 ├── Linux │ ├── deepin-20Beta-desktop-amd64.iso │ ├── Fedora-Workstation-Live-x86_64-32-1.6.iso │ ├── manjaro-xfce-20.0.3-200606-linux56.iso │ └── ubuntu-20.04.1-desktop-amd64.iso ├── Utils │ ├── clonezilla-live-2.6.7-28-amd64.iso │ └── gparted-live-1.1.0-5-amd64.iso └── Windows ├── Win10_1903_V1_zh-CN_x64.iso ├── Win7_ultimate_zh-CN_x64.iso └── WinXP_SP3_EN_x86.iso
grub的配置文件就五花八门了,一般都是自己拼凑,再加上看文档,就能捣鼓出来。官方说明书可以看GNU GRUB Manual 2.04 ,英语水平不行的话,可以看GRUB2配置文件“grub.cfg”详解(GRUB2实战手册)
下面就提供一些可以依葫芦画瓢抄走的grub配置,我也在本文末尾提供了自用的grub.cfg,给各位参考。
grub自带了一套叫starfield的主题,在配置头部添加下面内容即可。
注意:$prefix就是/boot/grub
1
2
# 主题配置 set theme=$prefix/themes/starfield/theme.txt
如果需要使用其他主题,可以自行修改theme变量指向的文件。
grub默认只能找到esp,所以还需要通过uuid来找到之前设置的NTFS分区。这一步是必须做的,因为Linux iso全部存放在NTFS分区。
获取uuid可以用下面任意一种方法:
GParted,右键选中分区,点击information
lsblk
lsblk -f(列出所有文件系统)
lsblk -dno UUID /dev/sdb2(输出/dev/sdb2的uuid)
blkid(列出全部block device的属性)
blkid -s UUID -o value /dev/sdb2(输出/dev/sdb2的uuid)
然后按照下面这样写,自行替换下uuid。
1
2
set ntfs_uuid="7BB351DB761B4D10" search --no-floppy --set=ntfs_part --fs-uuid $ntfs_uuid
1
2
3
menuentry "Windows PE" --class=windows { chainloader /EFI/microsoft/boot/bootmgfw.efi }
这里给的例子是Ubuntu 20.04,其它Ubuntu版本(包括Xubuntu等各类衍生版)应该只需要修改isofile变量就可以了。
1
2
3
4
5
6
7
8
9
menuentry "Ubuntu 20.04.1 LTS (Focal Fossa)" --class=ubuntu { # 加载iso set isofile=/iso/Linux/ubuntu-20.04.1-desktop-amd64.iso loopback loop ($ntfs_part)$isofile # 有独显进不去安装界面,在下面一行最后加上nomodeset linux (loop)/casper/vmlinuz boot=casper iso-scan/filename=$isofile quiet splash # casper会创建一个可写环境(在livecd里头就可以安装软件) initrd (loop)/casper/initrd }
关于nomodeset,Ubuntu官方论坛的解释如下:
The newest kernels have moved the video mode setting into the kernel. So all the programming of the hardware specific clock rates and registers on the video card happen in the kernel rather than in the X driver when the X server starts.. This makes it possible to have high resolution nice looking splash (boot) screens and flicker free transitions from boot splash to login screen. Unfortunately, on some cards this doesnt work properly and you end up with a black screen. Adding the nomodeset parameter instructs the kernel to not load video drivers and use BIOS modes instead until X is loaded.
简单来说,添加nomodeset参数会让内核暂时不加载显卡驱动并使用BIOS模式,直到X11(X Window System)加载完毕。完整的解释可以看How to set NOMODESET and other kernel boot options in grub2 - ubuntu forums
这里给的是Arch Wiki上的例子,看起来跟Ubuntu派系差别挺大的。Arch派系应该都可以参照这个改。
1
2
3
4
5
6
7
menuentry "Arch Linux x86_64 (2020.08.01)" --class=arch { set isofile='/iso/Linux/archlinux-2020.08.01-x86_64.iso' set imgdevpath="/dev/disk/by-uuid/$ntfs_uuid" loopback loop ($ntfs_part)$isofile linux (loop)/arch/boot/x86_64/vmlinuz-linux img_dev=$imgdevpath img_loop=$isofile earlymodules=loop initrd (loop)/arch/boot/intel-ucode.img (loop)/arch/boot/amd-ucode.img (loop)/arch/boot/x86_64/archiso.img }
最后送上懒人包,我的grub.cfg的menuentry全都测试过,确认没有问题,可以稍作替换后直接拿去用。其中isofile是从NTFS分区的根目录开始算的,如果跟我存放iso的位置不同,那就需要自行修改。
Fedora我目前搞不定,也懒得搞,好像本来就没什么人用。
1
2
3
4
5
6
7
8
9
10
11
12
13
14
15
16
17
18
19
20
21
22
23
24
25
26
27
28
29
30
31
32
33
34
35
36
37
38
39
40
41
42
43
44
45
46
47
48
49
50
51
52
53
54
55
56
57
58
59
60
61
62
63
64
65
66
67
68
69
70
71
72
73
74
75
76
77
78
79
80
81
82
83
84
85
86
87
set theme=$prefix/themes/starfield/theme.txt set ntfs_uuid="7BB351DB761B4D10" search --no-floppy --set=ntfs_part --fs-uuid $ntfs_uuid menuentry "Windows PE" --class=windows { chainloader /EFI/microsoft/boot/bootmgfw.efi } menuentry "Ubuntu 20.04.1 LTS (Focal Fossa)" --class=ubuntu { set isofile=/iso/Linux/ubuntu-20.04.1-desktop-amd64.iso loopback loop ($ntfs_part)$isofile linux (loop)/casper/vmlinuz boot=casper iso-scan/filename=$isofile quiet splash initrd (loop)/casper/initrd } menuentry "Ubuntu 18.04.5 LTS (Bionic Beaver)" --class=ubuntu { set isofile=/iso/Linux/ubuntu-18.04.5-desktop-amd64.iso loopback loop ($ntfs_part)$isofile linux (loop)/casper/vmlinuz boot=casper iso-scan/filename=$isofile quiet splash initrd (loop)/casper/initrd } menuentry "Ubuntu 16.04.7 LTS (Xenial Xerus)" --class=ubuntu { set isofile=/iso/Linux/ubuntu-16.04.7-desktop-amd64.iso loopback loop ($ntfs_part)$isofile linux (loop)/casper/vmlinuz boot=casper iso-scan/filename=$isofile quiet splash initrd (loop)/casper/initrd } menuentry "Linux Mint 20 (Ulyana) Cinnamon" --class=mint { set isofile=/iso/Linux/linuxmint-20-cinnamon-64bit.iso loopback loop ($ntfs_part)$isofile linux (loop)/casper/vmlinuz boot=casper iso-scan/filename=$isofile noprompt noeject quiet splash initrd (loop)/casper/initrd.lz } menuentry "Deepin 20 Beta" --class=deepin { set isofile=/iso/Linux/deepin-20Beta-desktop-amd64.iso loopback loop ($ntfs_part)$isofile linux (loop)/live/vmlinuz.efi boot=live union=overlay live-installer findiso=$isofile locales=zh_CN.UTF-8 quiet splash initrd (loop)/live/initrd.lz } menuentry "Arch Linux x86_64 (2020.08.01)" --class=arch { set isofile='/iso/Linux/archlinux-2020.08.01-x86_64.iso' set imgdevpath="/dev/disk/by-uuid/$ntfs_uuid" loopback loop ($ntfs_part)$isofile linux (loop)/arch/boot/x86_64/vmlinuz-linux img_dev=$imgdevpath img_loop=$isofile earlymodules=loop initrd (loop)/arch/boot/intel-ucode.img (loop)/arch/boot/amd-ucode.img (loop)/arch/boot/x86_64/archiso.img } menuentry "Manjaro 20.0.3 xfce (200606-linux56)" --class=manjaro { set isofile='/iso/Linux/manjaro-xfce-20.0.3-200606-linux56.iso' set imgdevpath="/dev/disk/by-uuid/$ntfs_uuid" loopback loop ($ntfs_part)$isofile linux (loop)/boot/vmlinuz-x86_64 img_dev=$imgdevpath img_loop=$isofile earlymodules=loop initrd (loop)/boot/intel_ucode.img (loop)/boot/amd_ucode.img (loop)/boot/initramfs-x86_64.img } menuentry "GParted Live 1.1.0-5 64-bit" --class=utils { set isofile=/iso/Utils/gparted-live-1.1.0-5-amd64.iso loopback loop ($ntfs_part)$isofile linux (loop)/live/vmlinuz boot=live union=overlay username=user config noswap noprompt ip=net.ifnames=0 toram=filesystem.squashfs nosplash findiso=${isofile} initrd (loop)/live/initrd.img } menuentry "Clonezilla Live 2.6.7-28 64-bit" --class=utils { set isofile=/iso/Utils/clonezilla-live-2.6.7-28-amd64.iso loopback loop ($ntfs_part)$isofile linux (loop)/live/vmlinuz boot=live union=overlay username=user config noswap noprompt ip=net.ifnames=0 toram=filesystem.squashfs nosplash findiso=${isofile} initrd '(loop)/live/initrd.img' } if [ ${grub_platform} == "efi" ]; then menuentry "UEFI firmware setup" { fwsetup } fi menuentry "Reboot" --class=reboot { reboot } menuentry "Shutdown" --class=halt { halt }
自己折腾一轮之后,还是学到了不少grub相关的知识。虽然说网上也有现成的,但是抄过来还是容易出现各种各样的小毛病,最后还是回过头去翻英文的Wiki和Manual。话说回来,Windows安装盘不清楚能不能跟WinPE一样引导,不过应该也没有这个需求,因为可以直接在WinPE里头挂载Windows iso进行安装。反正我现在全都引导都丢给无敌的grub2处理,以后安装Linux和Windows再也不用反复烧录了,而且替换新版本的iso文件也特别容易。
参考文章:
研究完才发现有个叫Ventoy 的开源项目,也是基于grub2的,而且似乎是动态生成menuentry。。。